Pri-views - Installation Guide
The implemented tool is composed of two distinct applications:- the first one is a command line program developed in C++, which implements the greedy algorithm designed by UNIBG and UNIMI;
- the second one is the Graphical User Interface (GUI) developed in Java that simplifies the use of the first one.
The applications have been developed in standard C++ and Java, therefore they should be compatible with almost all the operating systems (OS) currently in use. Under MS Windows, the released version is ready to run, while under other OSs (e.g., Linux), a few installation steps are required.
How to Install
After the correct installation of the tool, the reader has to open the OS shell, go to the directory where the program has been installed, and input the following command at the prompt: java -jar Esorics09GUI.jar, to start the graphical user interface.To install the tool, the first step is to uncompress the file fragmentation.zip in directory selected by the reader (from now on called installation directory). Below, we briefly list and describe the files and directories contained in the installation directory:
- Esorics09GUI.jar : the Java GUI application;
- esorics09.exe: the MS Windows command line application;
- run.bat: the MS Windows script that can be used to start the GUI application;
- run.sh: the Unix like script that can be used to start the GUI application (a bash shell is needed);
- esorics09.properties: the preferences file of the GUI application;
- Example.txt: the example project presented in in the How to Use the Tool section;
- cpp: the directory containing the C++ application source code. The directory is a MS Visual Studio 2005 project, but there is also a Unix like makefile in subdirectory esorics09;
- java: the directory containing the Java application source code. The directory is an Eclipse project.
- src: the directory containing the source code of the tool applications, structured as:
MS Windows
To start the tool under MS Windows, the reader has to double-click on the run.bat icon included in the installation directory. Alternatively, the reader can open the Windows shell, go to the installation directory, and input the command run.bat.
Other Operating Systems
To use the tool under other OSs, the reader has to compile the C++ application for the specific OS. In the following, we provide the steps needed under Unix like OSs:
- open the OS shell and go to the installation directory;
- follow the directory sequence cpp > esorics09 to go where the makefile is stored;
- modify lines 5 and 6 of the makefile file, inserting the right path to the local installation of the Boost C++ Library;
- use the following command line: make;
- copy the generated file esorics09 in the installation directory;
- grant to file esorics09 the permission of execution, using the following command line in the shell: chmod u+x esorics09.
- run the GUI application using the command line: run.sh and configure it using the menu File > Preferences... (see Graphical User Interface section).
Graphical User Interface
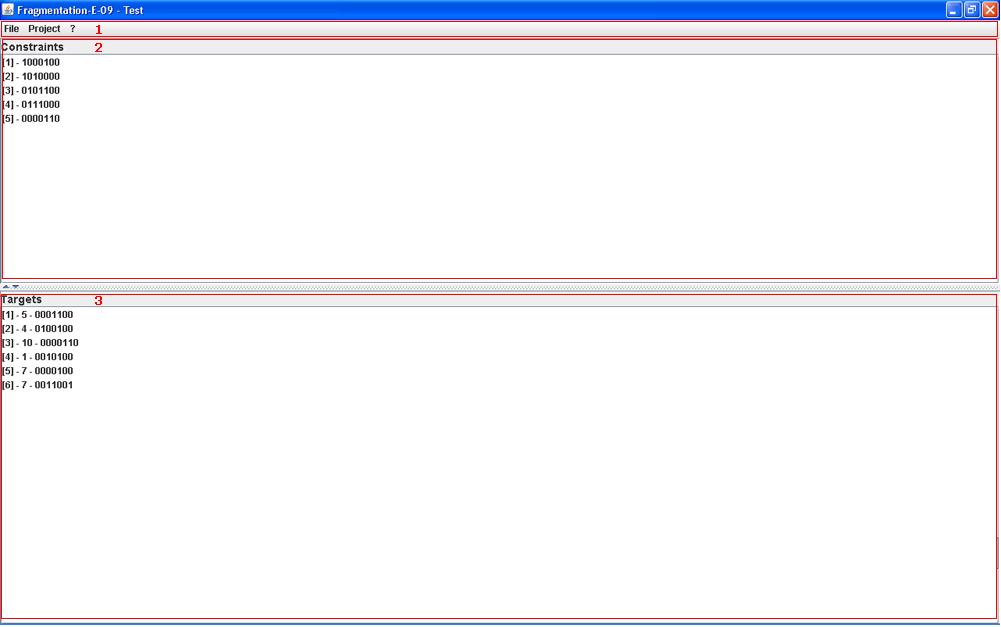
In this section we describe the GUI of the presented tool. The main application window is characterized by the following three areas:
- on the top of the form there is the application menus area;
- under the application menus area there is the constraints view area, showing the constraints already inserted;
- under the constraints view area there is the targets view area, showing the targets already inserted;
The application menus area is characterized by the following structure:
-
File
- New..., to create a new experimental project;
- Load..., to load an already saved project;
- Save As..., to save a project in a specific location in the file system;
- Save, to save the project (only if it has already been saved with the Save As... menu);
- Preferences..., to configure the application preferences (i.e., which application has to use for the experiments);
- Exit, to close the application;
-
Project
- Add Constraint..., to add a new constraint to the project;
- Add Target..., to add a new target to the project;
- Run..., to execute the experiments represented by the current project;
-
?
- About..., to show the credit information about the application.
Constraints view and targets view areas support specific actions related with the management of constraints and targets, respectively, via popup menus. The two popup menus are identical. In the following we describe only the popup menu related with the constraints view:
- Add Constraint..., to add a new constraint to the project;
- Modify Constraint..., to modify the selected constraint;
- Delete Constraint, to delete the selected constraint;
- Delete All Constraint, to delete all the constraints already inserted.
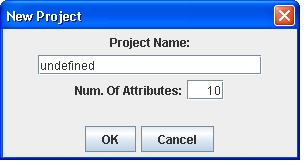
The next picture shows the dialog used to create a new project. In this dialog there are two mandatory fields: Project Name, representing the name of the new project, and Num. Of Attributes, representing the maximum number of attributes that can be used to describe constraints and targets. This last field has to be an integer number in the range between 4 and 120. The button Ok closes the dialog, creating the new project; while the button Cancel closes the dialog without creating any project.
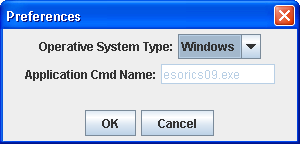 The next figure shows the dialog used to configure the preferences of the application. The dialog is composed of a combobox representing the type of OS supported, and a text field representing the C++ application to run to generate the experiments. The combobox can assume the following values:
- Windows, for MS Windows machines;
- Unix like, for Unix based machines (e.g., Linux, Mac OS X, etc.);
- Others, for all the other machines.
The text field (that can be modified only when Others is selected in the combobox) represents the name of the application to run to generate the experiments; this application has to be stored in the GUI application directory. The next figure illustrates the dialog used to add (or modify) a constraint to the project. The main area is composed of a set of checkboxes representing all the attributes in the project. Checked boxes represent the attributes composing the constraint. The button Add (Modify) closes the dialog adding (or modifying, respectively) the constraint, while the button Cancel closes the dialog only.
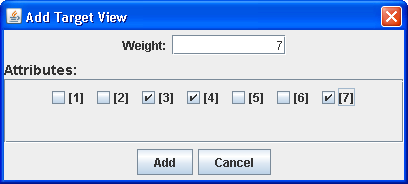 The next picture shows the dialog used to add (or modify) a target to the project. On the top of the dialog there is a field to set the weight for the target; while the main area is composed of a set of checkboxes representing the attributes composing the target set. The button Add (Modify) closes the dialog adding (or modifying, respectively) the target, while the button Cancel closes the dialog only.
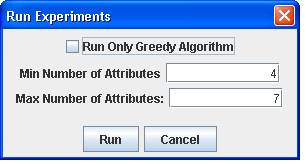 The next picture illustrates the dialog used to start experiments. The dialog is composed of a checkbox named Run Only Greedy Algorithm, and two fields named Min Number of Attributes and Max Number of Attributes. The checkbox, if selected, permits to lunch the experiments using only the greedy algorithm, while the two fields represent the extremes of the range for the number of attributes used to produce the experimental results. This means that the program will be invoked iteratively with, as a number of attributes, all the values in the range defined by the two fields. Note that constraints and targets are adjusted in length (trunking or padding) according with the number of attributes in use. The button Run executes experiments, while the button Cancel closes the dialog only.
When the experiments are finished the dialog showed in the next picture is displayed. This dialog is a table composed of the following columns:
- the number of attributes used for the experiment;
- the cost of the exhaustive solution;
- the cost of the greedy solution;
- the time spent to find the exhaustive solution (in milliseconds);
- the time spent to find the greedy solution (in milliseconds);
- the time spent to find the exhaustive solution (in cpu ticks);
- the time spent to find the greedy solution (in cpu ticks);
- the exhaustive solution (represented ad a string of bits);
- the greedy solution (represented ad a string of bits).
Each row represents the results related with the specific number of attributes, indicated in the first cell of the row itself. The button Save... permits to save the table content in a text file, while the button Cancel closes the dialog.